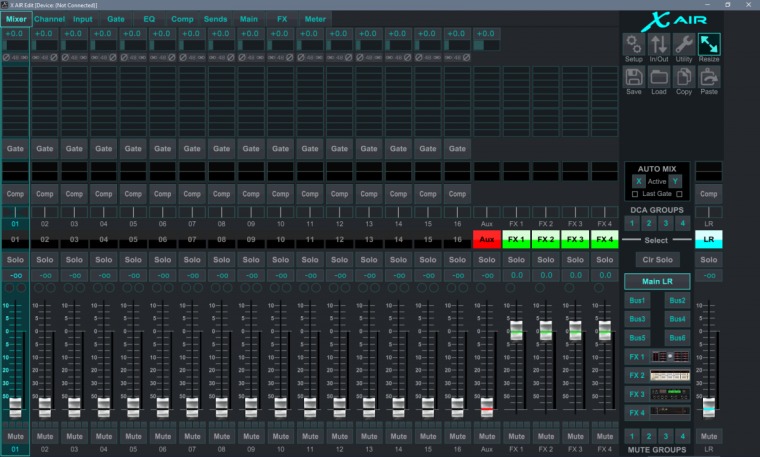

This article is part one of my Behringer Air XR18 review. This section will focus on introducing the mixers control application and looking at the first few control tabs that make up the Channel Strip.
In order to use the Behringer Air XR18 you need to have a device running X Air Edit. This application is available on Windows, OSX, IOS, Android and the Raspberry Pi 2. Note that the OSX version does not have touch support; due to Apple's lack of driver support for touch screens, and the Android version is a version behind the latest release of the software.
The current edition of the software is Version 1.3 which fixes most of the issues people have been having, adds a few new features and makes the application look nicer. Behringer seem fairly proactive in releasing updates for both the control software and mixers firmware so it will be interesting to see what they do to add features over the next few years.
To connect the application to the mixer you can:
- connect the control device to the mixer's on-board wireless access point. Note that this option only supports connecting up to 3 control devices. The on-board wireless access point can be secured by WPA.
- connecting directly via Ethernet.
- connecting the mixer to a LAN network and/or a third-party wireless access point
- connecting the mixer to wireless access point as a client.
X Air Edit application feels and operates much like other digital mixers do with most controls hidden under layers and faders changing what they control depending on what Buss you have selected. While on each platform the control software is differently laid out (optimised for each platforms control input) the way the all the controls are grouped remains mostly the same; into several different tabs:
- Mixer Tab

This Tab gives an overview of the Send Faders positions, Gate preview, EQ preview, Compressor preview, Pan state, Input Polarity state, Phantom Power state, Gain level and Stereo Link state on each channel. You can directly edit the Send Faders, Pan, Input Polarity, Phantom Power, Gain level and Stereo Link state features on this tab by Clicking/Tapping (CT).
However, many of these options are too small to be tapped on from a touch screen on the Windows version.
If you tap on a channels Gate, EQ or Compressor preview icon you will be taken to the relevant tab to edit the Gate, EQ or Compressor.
Channel Tab

The Channel tab gives a larger detailed overview of the Channel or Buss you have selected. You can see which channel you are viewing and editing by reading the scribble strip displayed in the top left hand corner. On this tab you can view the Gain, USB trim, Noise Gate, Equaliser and Low Cut, DCA and Mute group assigns, Pan and Db level. From this tab you can edit the Mic Gain, USB Trim, Gate threshold, Compressor threshold, Low Cut, Phantom Power, Polarity, Stereo Link, and Fx insert (virtual inserts only - there are no physical insert jacks) and turn the Gate, EQ, Compressor and USB Return on or off.
Part two of the review will continue to focus on more of the control tabs.